

Tips for the Step 3 CCS Cases
Written by Alison Yarp, MD, MPH
So you have scheduled Step 3 and created your study plan for the multiple choice. Unfortunately, you have a sinking feeling when you remember something…the cases! Don’t worry!
In this post, we’ll discuss the format of and strategies for the computer-based case simulations (CCS), but first let’s put things into perspective.
Think about it this way. You are already studying for the multiple choice, which covers everything from presentations to diagnostics to treatments for various diseases and traumas. Now, imagine your favorite video or computer game. When you are playing this game, you learn and develop strategies for reacting to certain situations and completing tasks. These strategies are based on knowledge you gained about the game’s content, which comes from an understanding of its components and…what else? Practice, practice, practice.
An important piece of advice I have for this part of Step 3 is just to practice as much as you can. Some cases will come easier to you than others, but in the end, developing routines for going through a case will benefit you in the long run.
Interface & Process
Where should you begin? The USMLE website has good information on the CCS with pages covering a CCS overview and common questions, so check those out if you need more information.
The cases occur at the end of the second day. There are 13, and every case is allotted either 10 or 20 minutes. In both situations, the final two minutes of that time is devoted to inputting last minute orders. It will tell you the timeframe before you begin each case.

So what happens when you start a case? Here is the order of information that you receive.
Chief complaint
It is a brief statement about the patient and what is bringing them to you for evalution. It will also tell you the location of the initial encounter.
Vitals
Includes everything except pulse oximetry, so keep that in mind for your initial orders!
Initial History
This is your full HPI, unless some parts are unable to be obtained.
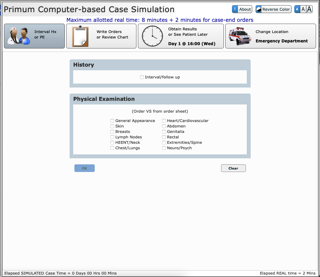
Whew! You made it through the initial part, but now let the games begin! Let’s go through each portion of the interface, now that you have reached the primary portion of the case. First, remember that you can always see your elapsed time at the bottom. The simulated case time is on the left and the real world time is on the right. Once the time on the right reaches 8 or 18, depending on if it is a 10 or 20 minute case, the screen will change to the ending, but more on that later!

Let’s look at the interface from left to right.
Interval History & Physical Exam
Here is where you will ask for follow up history during the case AND select your physical exam by system. Once you have selected your physical exams, it will give you a screen showing how much time it will take. Some systems are faster than others, as expected, but most take 1-2 minutes each. However, that can add up, so keep this in mind, depending on the urgency of the chief complaint.
2. Orders & Chart
This is where you will do a lot of typing! Here is your chart with the tabs at the top, and the orders button at the bottom.
The orders is basically a text box where you can type whatever you are looking for and search it. You only need 2-3 letters to search for something, and it also accepts abbreviations! If you are looking for a complete blood count, type CBC. For pulse oximetry, type pulse ox. Basically, be quick and strategic!
If you are unsure about how something will pop up, just type in a keyword, and you will probably find it. If you are wanting to see counseling options or consult services, just type counsel or consult, and you will see the entire list!
Another thing to remember is that you can type an entire list, and then it will take you to the search results one by one. So if you are working up something with a bunch of diagnostic labs, you may end up with a long list, but it will let you search for each one.


3. Clock
Key things to remember about the clock and timing are to base your choices in moving forward on the patient’s presentation. Most cases, I chose the next available result, since I was usually waiting on something. However, if you are doing an outpatient case, you can have the patient follow up in a couple days or so by choosing “On” or “In.”

4. Location
Changing locations is tricky because you want to make sure you have the patient in the right place based on their complaint. If you are in the office, and the complaint is urgent, change to the ED or inpatient unit. If you are doing an outpatient case, the patient will likely end up at home intermittently, depending on how long the workup and treatments take.

More Tips & Tricks
I know that was a lot of information, so here are some basic tricks that I used with the cases. Side note: the cases were the main section of the test that was above my overall performance, so hopefully these help you too!
PRACTICE, PRACTICE, PRACTICE!
Honestly, this is the main thing you need to do. It will help familiarize you with the order options, and the potential scenarios you may encounter.
Personally, when it comes to studying for these, the online practice options are well worth it. The one that simulates the exam best is the USMLE Practice Cases with Feedback (bottom of page). This is where the screenshots in this post came from. Since these 6 cases are put out by the USMLE, they are the best option for real simulation.
The other online option that is worth it is the CCS Cases (link takes you to the screenshots of the software). They have 140 practice cases and provide feedback, which is helpful in learning where you could improve and what the strategies are. Unfortunately, it starts at $70 for a 1 month subscription, but they do have two free cases, so you can try it out!
Lastly, there are books to help you prepare for the cases, but there really is no substitute for the practice you get going through different online options. Since the cases are a significant portion of the exam, try to practice as much as you can, whether it is with the USMLE cases a few times to get the hang of it or the other software.
Have a series of orders you do every time!
For every single case, I always started off my orders with CBC, CMP, UA, pulse ox. Even the outpatient cases typically required most of those. For a woman who was the right age to potentially be pregnant, I also typed UPT to pull up a pregnancy test. Otherwise, I would just keep typing based on my initial suspicions. This will become easier as you practice and learn the order options!
When in doubt, just type a keyword!
If you like mnemonics, here is another post from the Inside the Match website with some order lists to remember.
Don’t be shocked if you get kicked out of the case before the 8 or 18 minutes are up!
The cases are designed so if you end up with multiple positive patient updates (ie. the patient is improving or you’ve accurately diagnosed and treated them) or multiple negative updates (ie. patient is getting worse) it will take you to the final two minutes.
If you got positive updates, that’s great! You accurately treated them! If you got negative ones, DO NOT PANIC! Some of the cases will not improve at all and no matter what you do, the patient decompensates. Either way, just finish the case and move on to the next one.
Enjoy the break from the multiple choice.
Yes, I mean that. It is hard to do this on your second day after hundreds of multiple choice questions, but it is something different, AND it signals that you are nearing the end of Step 3.
However, still put in as much energy as you can to do well on the cases because they do make a difference.
Got any questions about this portion of Step 3? Feel free to reach out to me on Twitter or Instagram @alisonyarpmd, and I will do my best to help or point you in the right direction!
Good luck!